Every week a drawing lands on my desk with the same note in the corner: deburr all edges. No size limit, no method, nothing an inspector could check. I quote those parts, and I quote them with a premium, because that one line tells me the buyer has not thought about what a burr is or what removing one costs. A burr is not a cosmetic issue. On a medical device enclosure it can cut a glove and the skin under it. In a hydraulic manifold it can break loose, travel downstream, and jam a valve spool. On a sealing face it can hold a part out of flat by more than the tolerance printed on the drawing. Here is how I ask buyers to specify deburring: with numbers, a method hint, and an acceptance limit a shop can actually inspect.
Why "deburr all edges" is a costly line
When a drawing says "deburr all edges" and stops there, every shop guesses, and every shop guesses differently. One shop breaks the edges with a file in two minutes and calls it done. Another assumes you want a small radius on every edge and routes every part through a secondary operation. I have watched the same aluminum bracket quote 25 percent apart from two capable shops, and the only difference I could find in the paperwork was how each shop interpreted that note.
Three problems follow from a vague callout. First, the cost per part is padded, because the shop prices its worst-case habit rather than your real need. Second, inspection turns into an argument, since "deburred" has no measurable definition and nobody can prove the part wrong or right. Third, the risk lands in the wrong place: if a burr later causes a field problem, the drawing gives you no lever to pull, because the note was technically satisfied.
I tell buyers a simple thing. A deburring callout costs nothing to write and takes five minutes. Left vague, it quietly costs 10 to 25 percent of the unit price on precision work.
Where burrs form and how big they get
Burrs form where the tool exits the material. On a CNC machined part I expect them at drill breakthrough, at the exit of end mills along pocket walls, at parting faces on lathe work, and above all at cross holes, where the drill breaks through into a passage and leaves a flag-shaped burr that can reach 0.2 to 0.5 mm tall. That cross-hole burr is the one that causes the most trouble, because it hides inside the part where nobody looks.
Material changes the picture. Aluminum 6061 is soft and gummy, so it tears and pushes long burrs unless speeds and feeds are right. Stainless 316L work hardens, so a dull tool smears the burr onto the surface instead of cutting it clean, and a smeared burr is harder to remove than a tall one. See our aluminum 6061 and stainless steel 316L pages for the grade-level details.
Burrs are not a machining-only question. Powder metallurgy parts carry a parting line flash that behaves like a burr, investment castings need gate remnants and parting line fins blended off, and metal injection molding parts come out of the sintering furnace with small edge burrs from the inject step. Whatever the process, the drawing still needs a number on it.
Edge break versus burr free: pick one
Most drawings need an edge break, not a burr limit. An edge break means the sharp corner is replaced by a chamfer or radius, and I ask for 0.1 to 0.3 mm at 45 degrees as the default. It costs little, it makes the part safe to handle, and it improves coating and gasket seating. ISO 13715 gives you a proper way to draw it, with an edge condition symbol and a value, and I recommend using the symbol rather than a text note.
"Burr free" is a different animal, and I push back when I see it written alone. Free of what? A burr is a real three-dimensional object, so give it a height. My working definitions:
- Edge break: 0.1 to 0.3 mm, no height limit needed, visual check.
- Burr height limit: 0.1 mm maximum for general parts, checked visually at 10x.
- Burr height limit: 0.05 mm maximum for parts assembling against a seal, O-ring groove, or mating face.
- Burr height limit: 0.02 mm maximum where a loose burr can travel and block something, and only when you mean it, because this is where inspection cost starts.
Absolute words like "burr free" with no number are a contract dispute waiting to happen. I once sat in a rejection meeting where the buyer's drawing said burr free and the supplier's inspection report said visual, pass. Both parties were honest. The spec was empty.
Deburring methods and cost per part
The method follows the geometry, and the geometry decides the price. Here is the menu I work from, with the numbers I put in front of buyers.
| Method | Cost per part | Best for |
|---|---|---|
| Barrel tumbling | $0.02 to $0.06 | Small parts in lots, blunt edges, uniform finish |
| Vibratory finishing | $0.03 to $0.10 | Round media contact, edges 0.05 to 0.1 mm radius |
| Hand deburring | $0.15 to $0.60 | Complex parts, low volume, one-off tooling edges |
| Thermal energy method | $0.10 to $0.25 | Internal cross holes, inaccessible burrs |
| Electrochemical | $0.20 to $0.50 | 316L and hardened parts, tight edge geometry |
| Abrasive flow machining | $0.50 to $2.00 | Internal passages, manifolds, tight radii |
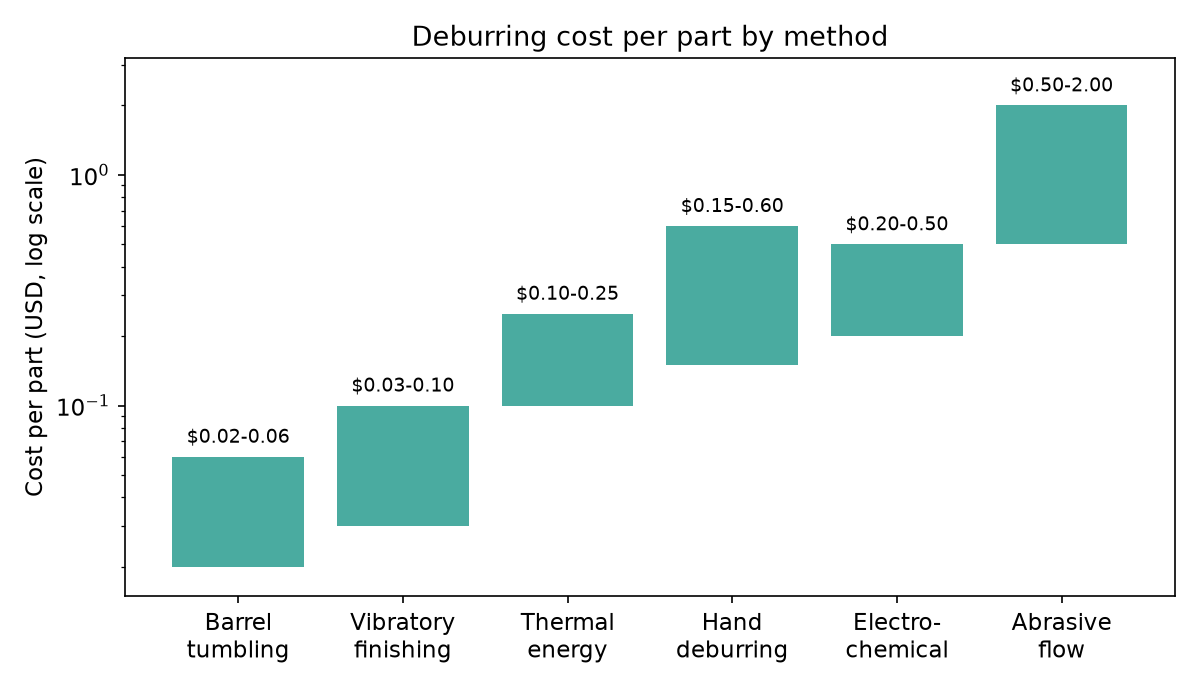
Two practical notes. Vibratory finishing rounds every edge it can touch, which is usually a benefit, but it can knock 0.05 to 0.1 mm off sharp corner dimensions, so it needs a floor before you call it "no effect". And hand deburring is the only method that scales badly: at 500 pieces it is fine, at 50,000 pieces it is the most expensive line on the quote.
How to write the deburring callout
Here are the callouts I actually write, in order of how often they are right.
- "Break all sharp edges 0.1-0.3 mm x 45 deg" for the general case. One line, inspectable by eye and caliper, and almost every shop prices it fairly.
- "Deburr, burr height max 0.05 mm" when something assembles against a seal or a sliding face.
- "Deburr, burr height max 0.02 mm, including cross holes, thermal process preferred" when a loose burr can block a passage. Naming the method removes the last guess.
The price reacts to what you write. On quotes I have reviewed, a drawing with no deburr callout at all tends to carry a 15 to 25 percent premium, because shops protect themselves against the unknown. A defined 0.05 mm limit prices about 20 to 40 percent over the basic edge break. A 0.02 mm limit with cross holes and a named inspection method can double the finishing cost, and I still recommend it where the failure mode justifies it, because a field jam costs far more than the premium.
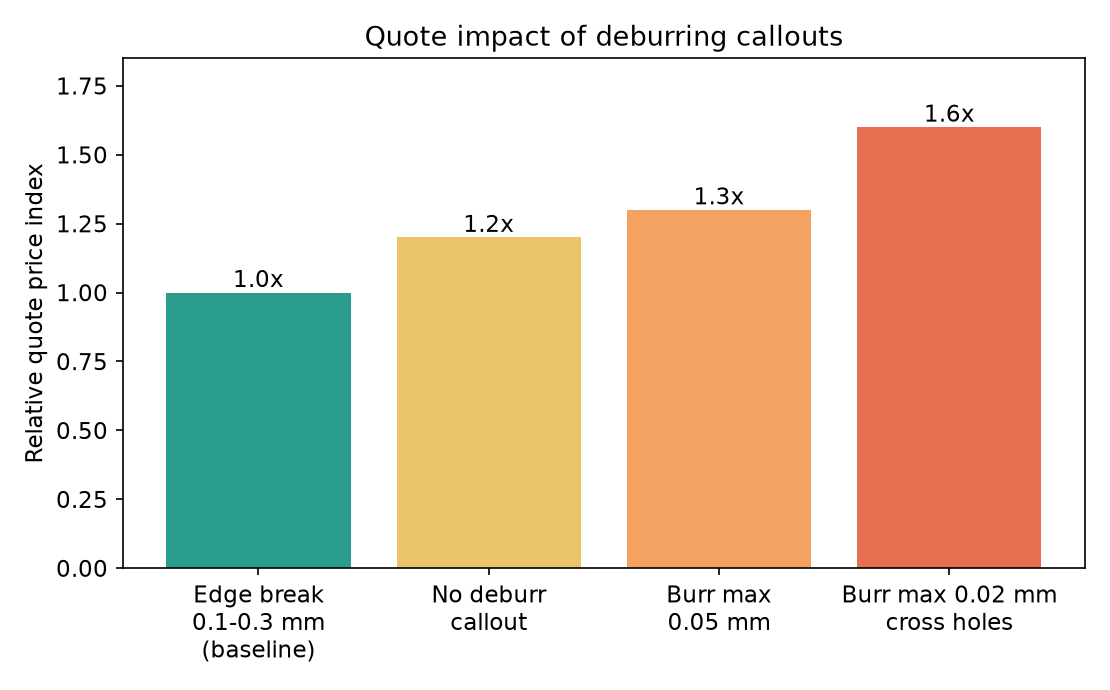
One more habit that saves money: mark the exceptions on the drawing. If a gauge face or an optical mounting pad must stay sharp, or a dowel pin hole edge must stay within 0.05 mm of nominal, call it out. Shops protect every edge when you protect none, and over-protecting is where the 0.02 mm prices come from.
Inspection and acceptance
A limit without an inspection method is a wish. For a 0.1 mm limit, a bright light and a 10x loupe at the exit edges are enough, and every shop can do that. For 0.05 mm, I add a cotton swab drag along internal edges; a snag you can feel is a burr you can measure. For 0.02 mm, plan on a microscope, and accept that internal cross holes may need a sectioned sample or a borescope, unless the burr was removed thermally in the first place.
Sampling works fine here. On production lots I use ANSI/ASQ Z1.4, general inspection Level II, AQL 1.0, and I have rarely seen a deburring nonconformance that first article review did not catch. One warning from experience: do not write "100 percent burr inspection" on a high-volume part unless you intend to pay for it. Full visual inspection on 20,000 parts is a slow, expensive, error-prone job, and a defined edge break would have made the whole conversation unnecessary.
My closing advice is the same as it is for surface roughness: a number beats an adjective, every time. Write the edge break, name the tight spots, and let the shop pick the method. If you want to see how we handle edge condition across processes, the How we work page and the FAQ cover what we ask for on a drawing before quoting.
Related reading
- What plating options protect steel from rust
- How to specify surface roughness requirement on a drawing
- Metal parts quality inspection checklist
- How to catch porosity issues before parts ship
Frequently asked questions
How much does deburring add to the cost per part?
On a simple turned part, hand deburring adds about $0.15 to $0.60 per piece. Tumbling or vibratory finishing adds $0.02 to $0.10. Thermal or abrasive flow deburring of internal cross holes can add $0.10 to $2.00 depending on lot size.
What is the difference between an edge break and burr free?
An edge break removes the sharp corner, typically 0.1 to 0.3 mm at 45 degrees, and allows a small attached burr to be specified separately. Burr free means no burr exceeds a stated height, for example 0.02 mm, and it needs a real inspection method behind it.
Is deburring included in a machining quote?
Sometimes, but never assume it. If the drawing has no deburring callout, shops price their own habit into the quote, and I have seen the same part quote 25 percent apart for that reason alone. State the requirement and you get comparable numbers.
How do you inspect for burrs on internal cross holes?
A bright light and a 10x loupe will not reach inside a 3 mm cross hole. I use a cotton swab drag test for feel, then a borescope or a sectioned sample under a microscope when the limit is below 0.05 mm. Thermal deburring removes the burr so nobody has to reach it.
What burr height limit should I specify?
Start at 0.1 mm for general metal parts, 0.05 mm for parts that assemble against a seal or a mating face, and 0.02 mm only where a burr can break loose and travel, such as hydraulic or medical parts. Tighter than 0.02 mm is where cost climbs fast.
Need Precision Metal Parts for Your Project?
Yujiaxin Tech specializes in MIM, CNC Machining, Powder Metallurgy, Investment Casting, and Gear Hobbing. Get a free quote within 24 hours.