A prototype and a production part are different objects. I have watched more than one program stall because nobody treated them that way. The prototype proved the design. It did not prove that you can make ten thousand of them on time, on cost, and inside the tolerance. Moving from prototype to mass production is its own job, and it starts long before the first production order.
When a prototype is not a production plan
A 3-axis mill making five parts lives in a different world from a tool making five thousand. The prototype shop optimizes for speed and flexibility. Production optimizes for repeatability and cost per part. The geometry that worked at five pieces can turn expensive or impossible at five thousand, and I have seen both happen on the same drawing.
It is common to hand a prototype drawing straight to a production quote and wonder why the price jumps or the lead time triples. The reason is usually a process change. What was machined gets molded, cast, or pressed, and each switch carries tooling, lead time, and a fresh set of failure modes that the prototype never exposed.
The cost crossover that decides the process
Pick the process from volume, not from habit. Every process carries a fixed cost you pay once, tooling or setup, and a variable cost you pay per part. Plot the two and the crossing point tells you which way to go.
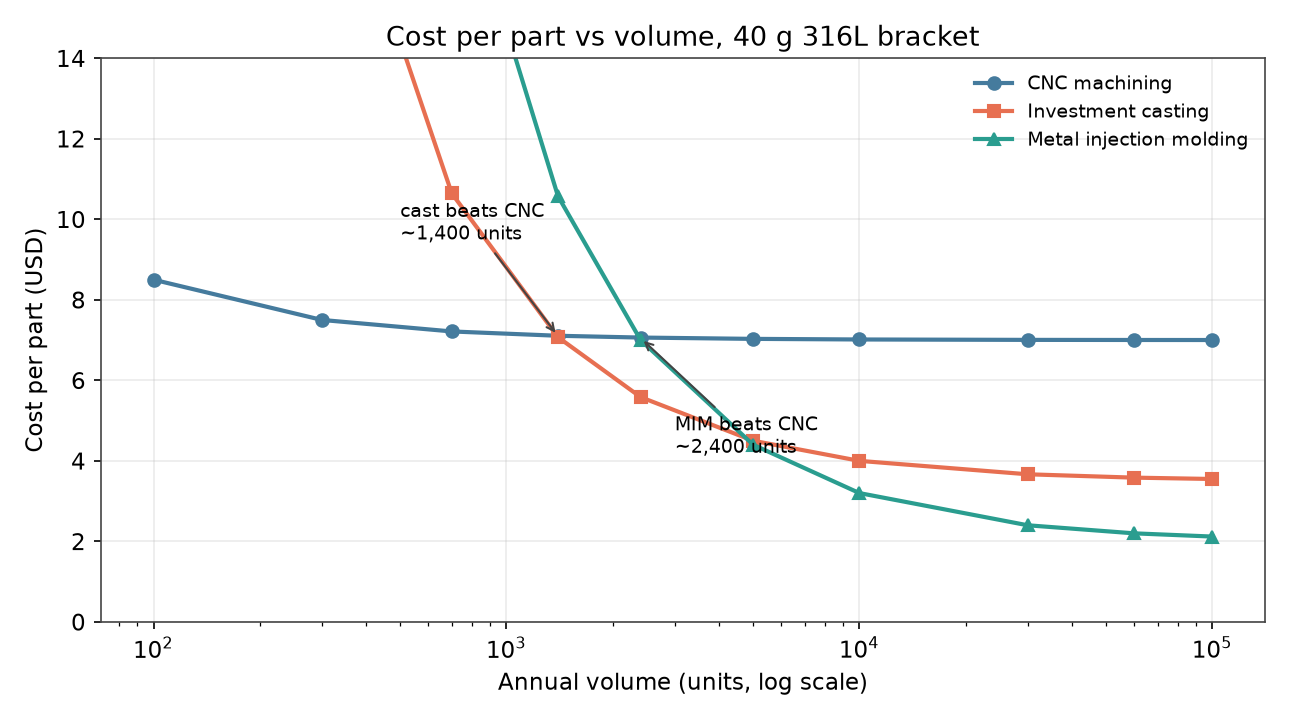
For a 40 gram bracket in 316L stainless steel, I use these working numbers. CNC machining: about $150 of setup plus $7.00 per part. Investment casting: $5,000 of tooling plus $3.50 per part. Metal injection molding: $12,000 of tooling plus $2.00 per part. The lines cross at roughly 1,400 units for casting and 2,400 units for MIM. Below those volumes, machining wins on cost and wins by a mile on lead time. Above them, the tooling pays for itself.
Break-even volume is the number I ask for first, because it frames every other decision. If your program needs only 800 parts a year, do not build a mold. If it needs 20,000, machining will bleed you on unit cost. The chart above is illustrative, but the method is not. Find the crossover before you commit capital, and the rest of the plan follows.
The same logic holds across materials. A titanium Ti-6Al-4V part carries a far higher cost per part from the start, so molding or casting only pays back at much higher volumes, and I treat those programs with a longer break-even view. See our CNC machining and investment casting pages for the process detail behind these numbers.
Tooling, NRE, and how long the lead time really is
Tooling is where the schedule hides. Teams budget machine time and forget the die. A CNC fixture takes one to two weeks. A powder metallurgy or investment casting die takes four to eight weeks. An MIM tool, with its tight tolerances and multi-cavity work, takes six to ten weeks, and if you need a second or third cavity for capacity, add more on top.
Then there is mold life expectancy, which decides whether the tool outlasts the program. MIM tools run 200,000 to 1,000,000 shots. PM dies reach 500,000 to 2,000,000. Wax injection dies for casting wear faster, often 10,000 to 50,000 good cavities before rework. I check the expected run against tool life before quoting, because a tool that dies at 40,000 shots is a problem if you need 200,000.
Non-recurring engineering, the NRE, is the lump you pay up front for design, tooling, and first article. Get it itemized. A single number hides whether you are paying for a real tool or a padded estimate, and I have caught both over the years. Our metal injection molding and powder metallurgy pages list the tooling steps so the NRE has no place to hide.
First article inspection and process capability
You do not learn whether a process is stable from the first good part. You learn it from a first article inspection and a capability study. For automotive work I expect PPAP level 3. For aerospace and medical, the first article follows AS9102, and safety-related characteristics need a Cpk of 1.67, not the 1.33 we accept elsewhere.
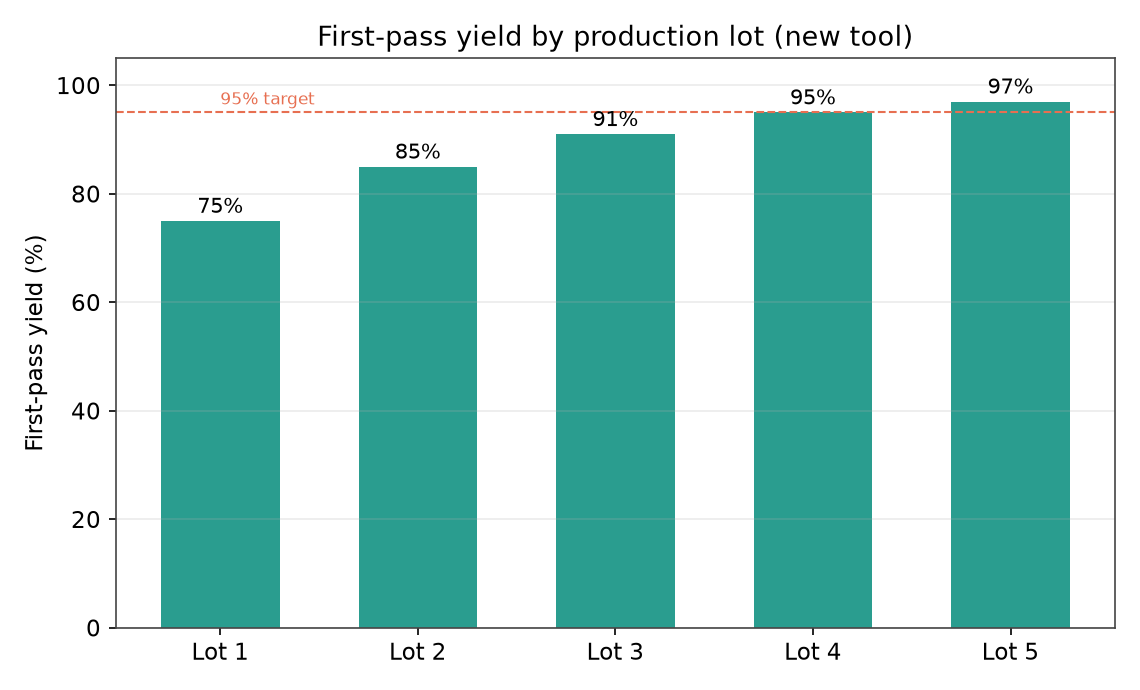
The ramp is where yields are won or lost. On a new tool, the first lot often runs 70 to 80 percent yield, sometimes worse, because gates, vents, and process windows are not yet dialed in. By the fifth lot we are usually above 95 percent. In parts per million that is a fall from roughly 250,000 ppm of defects at lot one to under 50,000 by lot five. That early scrap is real money, and I budget for it rather than pretend it will not happen.
I tell buyers this straight. The first production lot is a learning lot, not a shippable lot, on a complex tool. Plan to scrap or sort it. Teams that skip this step and treat lot one as production are the ones that miss their dates and their yields. The automotive and medical programs I run hold the tightest Cpk and the strictest first article rules, and for good reason.
How to sequence the handoff
Here is the order I use. First, lock the design and run a design for manufacturing review, because changing the part after tooling is the most expensive change there is. Then order the tool with the production supplier, not a separate prototype shop, so the process knowledge stays in one place. Run first article and a capability study. Approve. Then ramp in stepped volumes: a small lot, a mid lot, then full rate, watching yield at each step.
Keep the prototype line running in parallel for the first production lots. I have seen dates slip by six weeks when a tool failed qualification and there was no bridge stock. A small safety buffer of machined parts covers the gap while the molded line ramps, and it is cheaper than a line-down emergency. The How we work page shows where the prototype bridge fits in our own flow.
Common ways the ramp goes wrong
Most failures are predictable. Changing the drawing after tooling is the big one. It can mean a new tool or a weld repair, and either way it costs lead time you cannot get back. The second is skipping the capability study and trusting the sample. The third is assuming the prototype supplier and the production supplier are interchangeable. They are not. The processes differ, and so does the failure mode.
Another quiet problem is volume. I have watched a team tool for 100,000 units when the program needed 8,000, then wonder why the math never closed. Match the tool and the process to the real break-even volume, not the optimistic forecast. If you want the buyer-side view of the same trap, the FAQ and our supplier qualification guide cover what to check before you commit.
The handoff works when someone owns it as a project, not a checkbox. Lock the design, pick the process from the break-even volume, budget the tooling lead time and the first-lot scrap, and ramp in steps while the prototype line covers you. Do those, and the move from five parts to fifty thousand is boring, which is exactly what you want.
Related reading
- Why first article inspection matters for procurement
- Minimum order quantity for metal injection molding tooling
- MIM tooling cost amortization guide
- How to prepare CAD drawings for a CNC machining quote
Frequently asked questions
What is a realistic break-even volume for molding over machining?
For a small 316L bracket, investment casting usually beats machining above about 1,400 units, and metal injection molding above about 2,400 units, using typical tooling and per-part costs. Below those points, machining is cheaper and much faster to start.
How long does production tooling actually take?
CNC fixtures take one to two weeks. Powder metallurgy and investment casting dies take four to eight weeks. MIM tools take six to ten weeks, longer when you add cavities for capacity. Budget the die, not machine time alone.
What Cpk should I require for production parts?
For general characteristics, require a Cpk of 1.33. For safety-related characteristics in aerospace and medical work, require 1.67. Below 1.33 the process is not steady enough for production, and a one-off good sample will not prove it is.
Why does the first production lot have lower yield?
A new tool is not yet dialed in. Gates, vents, and process windows need real runs to settle. First lots often run 70 to 80 percent yield and around 250,000 ppm of defects, improving to above 95 percent yield and under 50,000 ppm by the fifth lot.
Should I keep the prototype supplier for production?
Not always. Prototype and production use different processes and different failure modes. I prefer to order the production tool from the production supplier so the process knowledge stays in one place, and to keep the prototype line as bridge stock during the ramp.
Need Precision Metal Parts for Your Project?
Yujiaxin Tech specializes in MIM, CNC Machining, Powder Metallurgy, Investment Casting, and Gear Hobbing. Get a free quote within 24 hours.